Computer Programming for Research and Application: LiveCode Development Environment
Programación de computadoras para investigación y aplicación: Entorno de desarrollo LiveCode
Bill Potter, Rosanne Roy and Shannon Bianchi
California State University, Stanislaus
Abstract
This paper provides an overview of the advantages that a behavior analyst might obtainfrom learning to program computers. A powerful, yet relatively easy to learnprogramming platform called LiveCode is reviewed and a tutorial is provided on thebasics of the platform. A variety of Behavior Analytic applications created using Live-Code are discussed and a sample receptive identification program is provided as anillustration of the efficiency LiveCode offers in developing such prototypes quickly forapplication or research.
Keywords: behavior analysis, computers, programming, LiveCode, research
Resumen
El presente trabajo proporciona una visión general de las ventajas que un analista de la conducta podría obtener de aprender a programar computadoras. Una plataformade programación potente, pero relativamente fácil de aprender llamada LiveCode se revisa y se proporciona un tutorial con los fundamentos de la plataforma. Una variedad de aplicaciones enfocadas en el análisis de la conducta, creadas usando LiveCode, son discutidas y se describe la programación de un programa de igualación a la muestra como una ilustración de la eficiencia que ofrece LiveCode en el desarrollo de este tipo de prototipos de forma rápida para la aplicación o la investigación.
Palabras clave: análisis de la conducta, computadoras, programación, LiveCode, investigación
An interesting relationship exists between the behavior of scientists and the application of technology. Many technologies have emerged from the behavior of scientists, but scientists tend to employ technology to enhance the reach and scope of their scientific activities. Thus some researchers have noted that a “coevolution” (Lattal, 2008) has developed between science and technology. From a behavioral perspective this seems logical – as new repertoires are added to an individual’s skill set, or new stimulus control developed, those repertoires/stimuli interact with existing repertoires to sometimes generate new behaviors (Catania, Ono & de Souza, 2000; Donahoe & Palmer, 1994; Shahan & Chase, 2002). In this article we will provide some arguments as to why learning to program computers is important for behavior analysts and introduce a relatively easy, yet powerful computer programming platform called LiveCode (http://livecode.com/). As noted elsewhere in this Journal (Escobar, 2014), electro-mechanical technology has been incorporated into behavior analysis for many years. An argument could be made that Skinner (1938) and Ferster and Skinner’s (1957) research with basic operant technology, established the foundation for the use of technology in the science of behavior analysis. Others have expanded on their research, publishing in journals such as the Journal of the Experimental Analysis of Behavior, The Journal of Applied Behavior Analysis and the very journal you are reading now. Over the years, electromechanical technology has developed to the point where computers are more than capable of controlling experimental operant devices as well as other devices that have proven to be useful for research and application in behavior analysis (Dallery & Glenn, 2005). Behavior analysts have recognized the utility of computers, and other technology in the field. A recent review of the Special Interest Groups (SIG s) (ABAI, 2014) for the International Association for Behavior Analysis reveals that of the 36 SIG s listed, two (5.5%) are directly related to the merging of behavior analysis and technology (Behavior Analysis and Selectionist Robotics and Behavior Analysis and Technology) and another three (a total of 13.8%) are heavily dependent on technology (Experimental Analysis of Human Behavior, Gambling, and Neuroscience). Of course many other areas of behavior analysis have incorporated technology to differing degrees. Behavior analysts have slowly merged behavioral technology with computer technology. To name a few, Headsprout (Layng, Twyman & Stikeleather, 2003 ) and Teachtown (Whalen, Liden, Ingersoll, Dallaire, & Liden, 2006; Whalen, et al., 2010) have fairly well established market shares for teaching basic language skills to typically developing children and with children diagnosed with autism. Sniffy the rat (Jakubow, 2007) has been used in behavioral classrooms for many years. The Center for Autism and Related Disorders (CARD) has developed a number of computer-based tools for practitioners (Granpeesheh et al., 2010; Jang et al., 2012; Persicke, et al., 2014; Tarbox et al., 2013). While these are commercial successes, other researchers and practitioners have been using computers for many years for similar purposes – in late 1980 the first author of this paper visited Los Horcones in Sonora, Mexico and witnessed a computer program written in HyperCard that taught many of the children there at that time to read. Technology offers many advantages to researchers and practitioners. Data gathered by a computer often have better reliability than with human observers especially with high rates of behavior. The computer also never gets bored, distracted or fatigued – if arranged correctly one can rest assured that the experimental conditions were applied when, and how the experimenter meant for them to be applied (Max, 2010). Of course computers and other technology also have limitations, one of the more significant is that computers often force researchers to examine selection-based responses versus topography-based responses (Michael, 1985). In essence, it is much easier for a computer (and human) to record and analyze responses that consist of clicking on an object on the screen versus analyzing the form (topography) of a response. Interestingly this has also been seen in operant chambers – pigeons and rats are often pressing on levers or pecking at keys. Studies exist that use technology and analyze topography-based responding (Jenkins, 1973; LaMon & Zeigler, 1988), but they are relatively infrequent. As exogenous technology (Lattal, 2008) develops, topographybased research is likely to increase as those technologies are adopted in behavioral research. The relatively recent development of the Kinect (Microsoft Kinect, 2011) and other devices will likely promote such research. Indeed some researchers have already been using such technology (Beleboni, 2014). Cell phones, which function as computers, also provide unique opportunities due to their prevalence, portability and different types of sensors they incorporate. Researchers have also looked at games from a behavioral perspective and examined the utility of using gamification to change behavior (Morford, Witts, Killingsworth & Alavosius, 2014). A good portion of gamification involves computer technology. While many behavior analysts do not have the technical skills to design the hardware behind computers, they likely have the necessary prerequisite skills to create rudimentary software (generally for research or personal use). Such skills include breaking tasks down to component parts, problem solving, and logical thinking – which, although not operationally defined, are skills needed for creating effective behavior change plans. For the remainder of this paper we will introduce you to a programming platform called LiveCode. LiveCode was modeled after HyperCard and, in essence, was designed to tap into existing repertoires to allow people to learn programming faster. That is, the syntax and vocabulary used in LiveCode is similar to a natural language. With recent advances in hardware, easy to learn programming languages like LiveCode can easily control external devices, record responses and, of course, create software that can utilize now readily accessible sensors (GPS , WIFI, accelerometers, etc.).
Some Uses of LiveCode
Over the years one of the authors has used LiveCode (formerly called Revolution) software in a number of applications related to basic and applied research. A few are briefly described below.
Operant Chambers
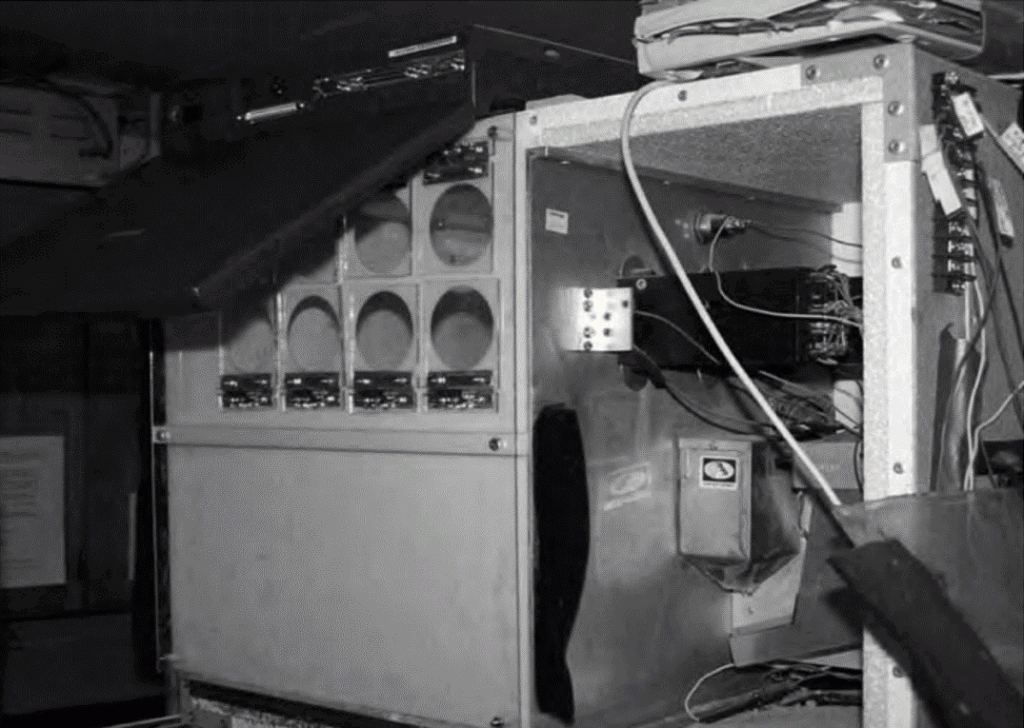
At California State University, Stanislaus we have a fully operational operant lab, with a colony of pigeons. As with many state funded universities, funding for research is slim. A typical operant chamber consists of three round disks (keys) for pigeons to peck, which are backlighted using projectors to display stimuli on the disks. These projectors cost upwards of $500, with one per disk – thus a minimum of $1500 per chamber for typically only 12 different stimulus lights per disk. Using older, donated laptops, we created a simple Plexiglas cover with 8 transparent disks hooked into our Med-PC system (see Figure 1). Each disk was designated as an input to our Med-PC computer – that is, each disk was simply a switch which let our main computer know which disk the pigeon pecked. With a laptop overhanging the operant chamber, we wired the main computer to relays (see Escobar 2014, in this issue for a description of relays) which were attached to an external keyboard connected to the laptop. The main computer communicated with the laptop through these keyboard “presses” (the Med-PC computer was programmed to generate the key presses). We used LiveCode to control the laptops, that is, to display images behind our Plexiglas disks. In LiveCode, it is a simple matter to create a program that does some action based on which keyboard letters were pressed. For example, here is some sample code (we will explain the LiveCode scripting language in more detail below):
on keydown whichkey
    if whichkey = “K” then beep
end keydown
In this case only when the “K” key is pressed will the computer issue a beep. “on keydown” is an event that is caused whenever a keyboard letter is pressed, “whichKey” is what is typically called a variable in programming languages – you can think of them as containers – in this case whichkey contains the letter that is pressed, and if that letter happens to be a K, then the computer will beep. The “end keydown” tells the computer you are done giving instructions. This may not make complete sense at this point, but suffice it to say, it is a simple matter to create this program once you become somewhat acquainted with LiveCode.
For our operant lab, the programming (or code, or scripting as LiveCode calls it) was more extensive – the computer program would wait for six keyboard presses – for instance “ABCDEF” and in the if-then part of script above, would put a particular image behind the first disk. If “ABCDDD” was received, a different image might be placed behind the second disk – that is, the key six-letter sequence functioned as a code to determine what image was placed behind which disk. Notice that in such a set-up, the number of visual stimuli that one can present is nearly unlimited – anything you can present on a computer screen. In addition, motion, videos, and sound can be presented through the computer’s speakers or via an external speaker. A number of second and third-order conditional-discrimination studies were conducted using this equipment and software (Duroy, 2005; Redner, 2009).
Tactile Stimulators
As Escobar (2014, this issue) has pointed out, it is relatively easy to attach boards to computers via USB or other ports. These can contain relays to operate other devices. In 2010 we conducted tactile discrimination research by using 16 micro push action solenoids (you know them as electronic door locks), mounted on Velcro, to tap participants. Basically the participants had these door locks on various parts of their body (arms, legs, abdomen, etc.) and when the computer activated a relay one of the door locks would spring up (as if unlocking the door) and tap the participant. We would then turn it off quickly so the participants experienced a brief tap. The study was examining participant’s ability to learn to respond to each tap (or two taps) as a single letter. In essence we were creating a device to aid a person who was deaf and blind. If a computer translated vocal verbal behavior to text – standard speech to text programs – for instance SI RI on the iPhone, or Dragon NaturallySpeaking (http://www.apple.com/ios/ siri/ & http://www.nuance.com/) then this program would tap out the letters for the person to “read” in a tactile manner. This device, coupled with behaviorally designed training resulted in participants learning at a much faster rate than with commercially available devices. However, it is bulky and clearly a prototype (Stanton, 2010). Notice that in this application the laptop computer used was controlling external relays – there are a number of ready-made relay boards designed for this purpose – at a cost of $50- $100 for about 16 relays. Once we were able to activate the relays (turn them on and off) it was a simple matter to program the training – have the computer tap the participant at a randomly selected location and ask them to type in the letter that location tap was assigned (we used discrete-trial training along with fluency). Externally controlled relays (as in this research) can be coupled with using a keyboard for inputs (as in the operant chamber research) to have an inexpensive method for recording responses (keyboard inputs – we dissected the keyboards to facilitate this) and for having environmental events to occur (the relays can trigger devices that can deliver reinforcers – turn on videos, provide access to food, open doors, etc.). In essence, one can use these techniques to create a low cost operant chamber, or other research related devices.
Computer-Based Tact Training versus Staff Training
Computers have long been used to provide training – with mixed results. In theory, the computer is an ideal teaching machine – Skinner described an effective one in 1958. The problems with computer-based training (CBT ) are not with the machine, but rather the lack of behavioral technology instilled into the lessons. Working with a local agency which had a specific method of training tacts, we created a computer program, using LiveCode that followed their training protocol exactly (the lead researcher was an employee of the site). We also used a touchscreen that covered the laptop screen (inexpensive and seamless integration with LiveCode – the software treated touches as mouse clicks). While it was a fairly complex computer program, the software worked well demonstrating the utility of CBT – the students learned just as quickly in the computer format and the training integrity (presentation of stimuli, reinforcers, etc.) was superior via the program (errors were made by the staff, but not the computer). One can see how such technology could drive down the cost of early intervention training using automation, although the effect on social skills for these children would need to be investigated (Max, 2010). These computer programs/applications are only a few of many (see Appendix A for a list and directions to download). The remainder of the paper will be a gentle and brief introduction to LiveCode.
LiveCode
Overview
LiveCode emerged along with MetaCard (LiveCode bought out MetaCard), and SuperCard from Apple-created HyperCard (Apple Computer, Inc., 1998). While different platforms, if you are familiar with any of these software development programs you will find LiveCode relatively simple to use. You can obtain LiveCode from this website: http://livecode.com/download/. The community version is free – you can create programs and use them for research, but selling them may be limited. The various licenses for LiveCode are specified here: http://livecode.com/livecode-licenses/ . LiveCode is quite powerful – you can create a program on your Macintosh, or on your PC, then save it in a manner in which it will work on either platform (this is called Cross Platform). In fact, if you create a program with LiveCode and take into account some minor considerations, it will run on the Mac OS, Windows, Unix/Linus, Android operating system and iPhone (IOS) operating system. LiveCode supports many of the functions that an advanced (lower level – meaning more control and thus more powerful) programming language has – such as arrays, associative arrays (hash tables), interfaces for databases, etc. For the remainder of the article, it might be useful if you read the article with LiveCode running on your computer.
The Structure of LiveCode
The analogy that LiveCode uses was borrowed from HyperCard – each program is called a stack. When you create a mainstack (menu item “File”, “New Mainstack”) a window appears, usually with the label “Untitled” on the top of it. It has the standard minimize, maximize and close buttons found on the left for the Mac and on the right for the PC. As soon as you create the mainstack you have also created the first card (there are also substacks – wait until you have learned more about LiveCode to explore them). Think of your stack as similar to a PowerPoint presentation – it is a single file that contains many slides. In LiveCode, the stack is like the entire PowerPoint presentation and a card is equivalent to one of the slides. After you create a stack in LiveCode you have a single file that may contain multiple cards (as many as you make, but at least one – card 1). When you start LiveCode (click on the LiveCode icon after you have installed it – generally it is on your desktop) a tools “palette” is likely to appear in addition to the menu bar. The tools palette is really just a smaller window with lots of objects on it – see Figure 2. You can drag items off of the palette onto your stack – in Figure 2 the first card has a number of objects on it – button, text field, image area (picture), and a player (for videos). Thus in a LiveCode program, a stack, contains cards, and those cards can contain a variety of objects such as text fields, buttons, media players, images and other objects which we will not discuss in this paper. Everything in LiveCode is considered an object – the stack, the cards, and the different items you can put on cards (note that LiveCode will sometimes refer to objects as controls). LiveCode has two different modes – run, and edit. If you are in edit mode (Menu item “Tools”, “Pointer tool”) or the arrow and “+” icon from the tools palette (see Figure 2) and you double click on an object you can view that object’s properties (see Figure 2). Each object has properties like size, position, coloring, text size, etc. You can modify these properties from the Property Inspector. For instance, if you examine a text field with the Property Inspector you can “lock text” of that field preventing end users from typing in that field. Perhaps more importantly, this allows that field to act like a button that will do things other than allow the user to enter text (see below). An important part of any object is its script – this is where the code the programmer writes resides in an object (see Figure 3). Finally, if you would like to get an overview of your stack (program), you can bring up the Application Browser (Menu Item “Tools”, “Application Browser”). As depicted in the bottom of Figure 2, this provides you with an overview of the program you have created.
Learning LiveCode Scripting
Programming, or scripting as LiveCode calls it, requires the programmer to carefully analyze all the steps involved in a task, and then write the instructions that will do these steps. Since the first author has extensive experience with LiveCode, he recruited two other researchers to aid in evaluating and informing the reader as to the experi-
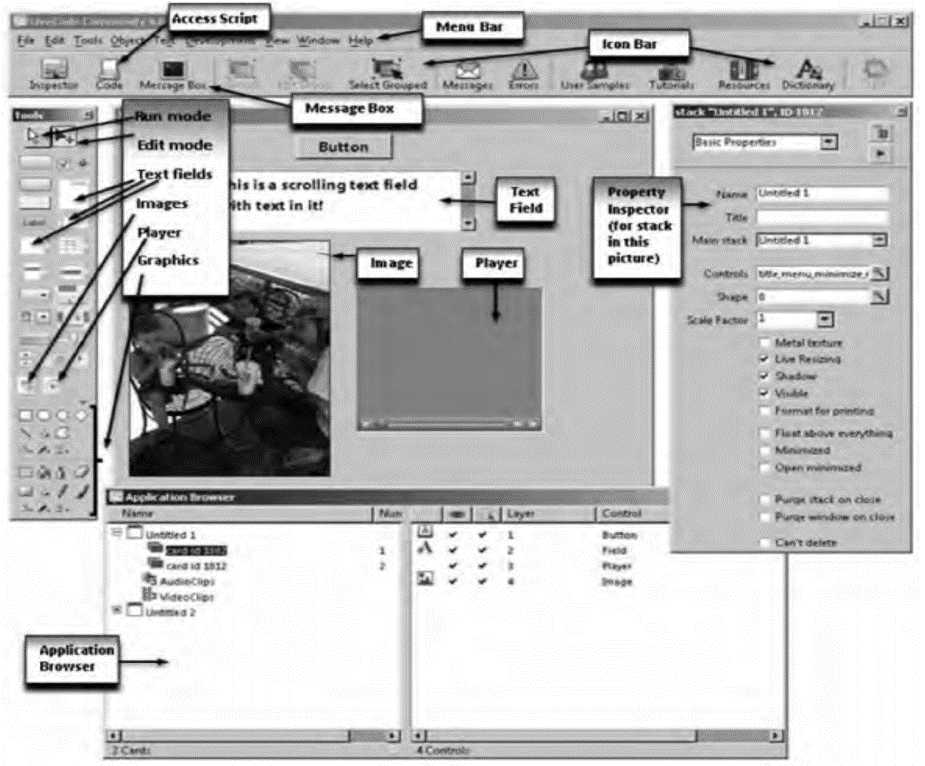
Figure 2. The LiveCode Environment showing the Tools Palette, the Application Browser, the Mainstack and the Property Inspector.
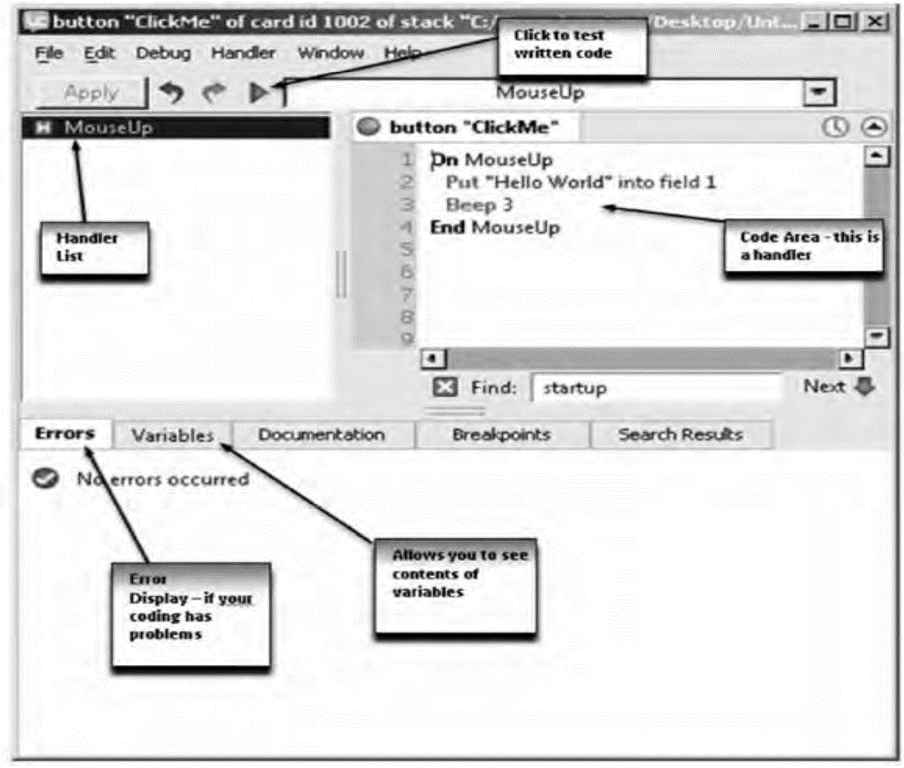
Figure 3. This window is displaying the script of a button named “ClickMe”. The script is the programming code – the mouseUp through mouseDown is called a handler – it handles the message “mouseUp” by performing the steps between the On and End. You can have multiple handlers in a script.
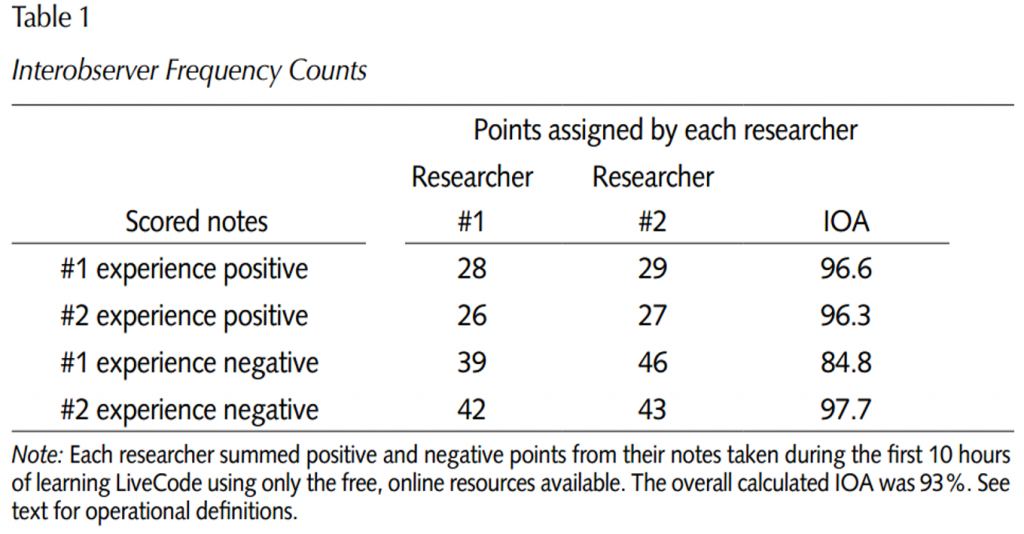
ences they are likely to encounter while learning to program in LiveCode. Each of these researchers have an advanced degree (one a MS in Behavior Analysis the other a Ph.D. in Developmental Psychology) and each have no programming experience. The task assigned to them was to use the free online help resources available with the free community version of LiveCode and spend a minimum of 10 hours learning to program. During this time they were asked to write down their observations as to the effectiveness of the available materials, problems encountered and potential projects they could envision as they learned more about the software. Overall these researchers both noted that the help files available from the LiveCode program (Menu Item “Help” – “Start Center”, or “Beginners Guide” or “Tutorials”) were not very effective for novices and caused frustrations (but see some of the advice from these researchers in Appendix B). Please note however, both of the researchers were able to create rudimentary programs. The notes from the researchers were analyzed with each scoring her own and the other researcher’s comments summing the positive and negative statements as well as ideas for future computer programs they might create. The operational definition of a negative statement was any comment related to the inability to complete a task or instructions that resulted in nonfunctioning code or where the instructions were unable to be followed (for any reason – ill defined, using terminology unfamiliar to the researcher, etc.) . The operational definition of a positive statement, was any comment about successfully completing a task or a comment expressing some other positive aspect of the learning experience: speed of learning, clarity of instructions, etc. Multiple comments about the same positive or negative experience were scored only once. An interobserver agreement (IOA) was calculated with the smaller of the two observer’s scores divided by the larger. Over all of the observations the IOA was 93%; for positives the IOA was 96% across the two observers and for negatives the IOA was 91%. For both sets of notes, the first researcher found a total of 54 positive comments, and 81 negatives (50% more negatives than positives), the second researcher found a total of 56 positive comments and 89 negatives (58% more negatives than positives – see Table 1 for the data). Together they generated six ideas for future programs. Based on the researchers’ feedback we purchased a copy of LiveCode University ($50: https://livecode.com/store/training/livecode-university/) and both researchers found that to be much better – targeted to first time programmers and easier to understand. However, they both noted that it was unclear if the previous 10 hours contributed to their understanding. LiveCode programming is similar to stimulus-response relationships, that is, the user may click a mouse (stimulus) and the computer responds. As a programmer, you attempt to anticipate these stimuli. The software developers call the LiveCode environment “Event Driven” programming (derived from McMenamin & Palmer, 1984).This means the software reacts to events (called messages in LiveCode – you can think of them as stimuli) which usually are caused by the person interacting with the program. For instance, when you use the mouse to click on a button created in LiveCode, three messages are sent to that button: mouseDown, mouseStillDown, and mouseUp (italics
are used to indicate LiveCode script; upper and lowercase text is to facilitate readability – LiveCode does not discriminate between upper and lower case text). In a single click each of these messages is sent to the button – in the logical order, mouseDown first, then mouseStillDown, then mouseUp. What the programmer does is either handle any or all of these messages (one of the reasons why LiveCode calls the code that reacts to an event a “handler”) or ignore them (not write a handler for them and they disappear). Below is a simple handler (bit of LiveCode script):
on mouseUp
    Put “Hello World” into field 1
    Beep 3
end mouseUp
(Please note that if you copy and paste this text the quotes may need to be replaced in LiveCode and you might have to add a return after field 1. If the “on mouseUp” and “end mouseUp” are already in the button do not copy those.)
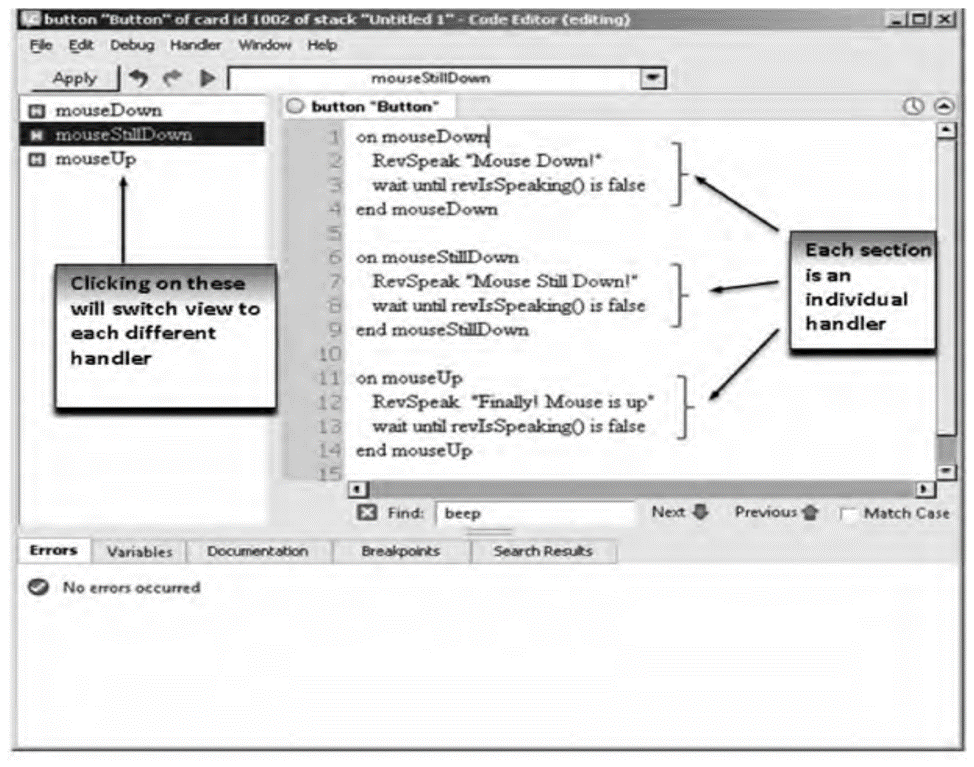
You could drag a button and field onto a card from the tools palette and put this “handler” in the button script (recall from above, it is where the instructions to the computer [code or scripting] goes). When the user clicked on that button, upon release of the mouse button “Hello World” would appear in the first text field placed on a card and then the computer would beep three times. The relevant parts of this handler are the message that activates it (the “on mouseUp”), the instructions to the computer (the “Put” and “Beep” lines) and notifying the computer that all is completed (“end mouseUp”). Notice that the code is very English-like (thus maybe “code” is the wrong word to use). This mouseUp handler would reside in the script of a button – you can access the script of any object by right clicking the object while in edit mode (see Figure 2) and selecting “Edit Script” or (also in edit mode) selecting the object and clicking on the code icon (see Figure 2), or finally, selecting the object then holding down the control key and pressing the E key (on the Mac it is the command key that you hold down). There are often multiple ways of accomplishing something in LiveCode – and that is particularly true when it comes to getting the computer to do some task. As you become more capable with using LiveCode, you will want to investigate what is called the Message Path – that is where the message goes from when it is first created – for instance the mouse click – to when it disappears. For now it suffices to say it is sent to the object that is clicked on, then if not handled, passes to the card that object is placed on, and then to the stack the card is part of. At any point in this message path the programmer can handle that message. But take note – once you handle a message, for instance a mouseUp sent to a button (using the handler above), it will stop there unless you pass it along – with a single line of code: “Pass mouseUp”. Then it continues along the message path where you can “handle” it again if you like (at the card or stack level for instance). Any object (card, graphic, image, field, etc.) can contain handlers in its scripting area – thus, you can put a picture of B. F. Skinner on a card and when the user clicks on it, you handle the mouseUp and have the computer play the National Public Radio (NPR) interview with B.F. Skinner from 1990 (Trudeau, 1990). You could do the same of a transcript of that interview – typed into a text field. To do so with a text field all you have to do is “lock” the field first (found by examining the properties of that field – in edit mode double click on the field to bring up the Property Inspector) – otherwise you will be set to type text into the field. Finally, each script can contain multiple handlers. For instance, you could place a button on a card, then edit the script of that button and have these three handlers in that button: (see Figure 4)
on mouseDown
   RevSpeak “Mouse Down!”
   wait until revIsSpeaking() is false
end mouseDown

on mouseStillDown
   RevSpeak “Mouse Still Down!”
   wait until revIsSpeaking() is false
end mouseStillDown

on mouseUp
   RevSpeak “Finally! Mouse is up”
   wait until revIsSpeaking() is false
end mouseUp
RevSpeak is a useful command to know – it will speak text that you specify – it can be in a text field – “RevSpeak field 1” or it can be as the above quoted text or as described below in a variable. For the script above, with three handlers, when the user clicks the button they should hear “Mouse Down” then “Mouse Still Down” then “Finally! Mouse is up”. If the user clicks very fast the mouseStillDown message may not be sent. If they click very slowly, the mouseStillDown message may be sent many times (roughly it is sent once every 60th of a second – called a tick in LiveCode) whereupon the user will hear the computer voice speak “Mouse Still Down” many times, then lastly hear “Finally! Mouse is up”. Since the computer is very fast, the “wait until revIsSpeaking() is false” tells the computer to wait until the speaking is completed before executing any more instructions. At this point you might be thinking to yourself that you could have the transcript of B.F. Skinner’s 1990 NPR interview in a field, lock the field (as mentioned above) then add a line of code to that field’s script:
on mouseUp
   RevSpeak field 1 -- Assuming it is the first field
end mouseUp
(the text after the “--” is a comment; you can put them in your handlers to explain what your code does – it comes in handy when you have to go back and modify your code).
Alternatively, when you are scripting within an object and referring to that object – for instance you put the mouseUp script above in the field that contains the interview with B.F. Skinner- you can write instead: “RevSpeak Me” (me instead of field 1). Objects can be referred to in a number of ways – by name, ID, or number. To learn more about what messages exist (hundreds!), explore LiveCode menu item “Help”, “Dictionary”, then on the left hand side – “Language” and “Message”. You will be given a list of nearly all the LiveCode messages along with a description of each when you click on it. For most purposes, the mouse messages along with openStack, openCard and closeCard messages will be sufficient for many programs you write. OpenStack is sent when you open the stack – your program. OpenCard is sent when you visit a card - including card 1 when you open the stack and closeCard when you leave a card to go to another card. You can also investigate the hundreds of commands in LiveCode by exploring menu item: “Help”, “Dictionary”, “Language”, “Command”. One final area we will cover before showing several behavior analytic relevant programs is the area of containers. For the rest of the programming world these are typically referred to as variables. HyperCard, and later LiveCode have referred to them as containers and it is an apt description. In practice, when you create one of these containers LiveCode reserves some space in the computer memory to stash in it whatever you want to put in the container. Typically it is some text, or numbers. Creating a variable is very easy – just put something into to. For instance you can write this mouseUp handler:
on mouseUp
   Put “Julie Vargas is B. F. Skinners Daughter” into WhatIwantTheComputerToSay
   RevSpeak WhatIwantTheComputerToSay
end mouseUp
If this handler is in a button and a user clicks on it, when the mouse comes up the computer will speak what is in the variable (container) WhatIwantTheComputerToSay. Of course you had the computer put “Julie Vargas is B. F. Skinners Daughter” into that container, so that is what is spoken. We could have written the simpler: revSpeak “Julie Vargas is B. F. Skinners Daughter” but we wanted to explore variables. Variables can be quite long, cannot contain spaces, cannot start with a number and should not be a word used in LiveCode - reserved words (i.e., commands, messages, etc.). Interestingly, a field is also a container – you can use it in the same manner as a variable. From a speed perspective however, variables are faster containers than fields – when you put something into a field, LiveCode makes sure to save it to your hard disk (permanent memory on your computer) which takes time, LiveCode does not do that for variables like “whatIwantTheComputerToSay”. Variables are limited however – they have what is called a “scope”. That is, not all of your handlers will be able to access that variable (container) – you have to be aware of this. For beginners, two simple rules are enough. First, if you specify a variable as global, you can access it on any handler as long as you specify that it is global for that handler. An example to clarify – in the script area of a button on card 1 you put this handler:
on mouseUp
   Global TestingVariable --- we made TestingVariable a global variable
   Put “Skinners Birthday is March 20th” into TestingVariable
end mouseUp
You can create a second card by clicking on menu item “Object”, then selecting “New card”. On card 2, you create another button and put this handler in the script area of that button:
on mouseUp
   Global TestingVariable
   revSpeak TestingVariable
end mouseUp
If you open your stack and go immediately to card 2 first and click on the button, your computer will not say anything - since you have not put anything into that container (and since it is specified as global it does not say the word “TestingVariable” but instead looks into the container and finds nothing). If you go to card 1 and click on the button, then go back to card 2 and re-click that second button, your computer will say “Skinner’s Birthday is March 20th”. If you were to delete the “Global TestingVariable” line from the card 2 button, click on the ‘Apply’ button to incorporate the change to the handler, then click on the button, the computer would say “TestingVariable” – it does so as there is no “global” statement to let it know that TestingVariable is a container, and since you did not put anything into it, it treats it simply as text and says it. In essence, if you put something into a variable name you created (e.g. “TestingVariable” or “CorrectAnswerCount”) or specify it as global, then LiveCode will look inside that container. If you do not do either of those things, then LiveCode will assume you are just writing text and if you are using the RevSpeak command, it will say those words (e.g. “TestingVariable” or “CorrectAnswerCount”). The second rule is that if you do not put the global label on a variable that you create, it disappears when the handler script is finished. Here is an example in which you want to count the number of times a user clicks on a button.
on mouseUp
   Add 1 to myCounter
   Put myCounter into field 1 --- presumably you put the field on the card!
end mouseUp
Every time the user clicks the button, a 1 will be put into field 1; it replaces the 1 that is already in the field (the computer is so fast that you will think nothing happened), but clearly the code is not counting the number of clicks. Clicks are not being counted because MyCounter became nonexistent when the handler ended (comes to the “end mouseUp”). When you click on the button a second time the variable is recreated for a moment, and then disappears again. To make it persist – add in the global designation as below:
on mouseUp
   Global myCounter
   Add 1 to myCounter
   Put myCounter into field 1
end mouseUp
Now it works great. Once the handler ends, the variable (container) myCounter remains and its contents are intact – due to the “global” statement. Of course you might be thinking – can’t I just use the field as the container and simply write: Add 1 to field 1? Definitely – as mentioned earlier in the paper there are many ways to accomplish the same thing and your methods will depend on what you need to present to the end user – do they need to see the field with the number in it (points earned perhaps?). If not, you might use a variable, or hide the field (coded as: hide field 1 - you can still put things into it however). If you need to see it again, just as simple: show field 1. Professional programmers will be adept at making the code very fast and very efficient – especially adapted to whatever computer platform they are targeting. As behavior analysts - likely amateur programmers - we will be adept at making the software the most effective for the user – this seems to us to be an important and critical distinction.
Example Program
Ok, now that you hopefully have a rough idea of how LiveCode works, we have designed a program below that is very simple, but hopefully demonstrates the utility of LiveCode for behavior analytic research or application. It is a simple program to train receptive identification of objects. An overview of what we want the program to do is very useful for designing the software – sitting down with a pad and drafting some notes will make creating the program easier. Here are a few ideas on what the program will do:
- Present four images on the screen and then ask the student to select one of them – receptive identification or what has been called manded stimulus selection (Michael, 1985).
- If the student clicks on the correct picture they should get feedback such as “Good Job!” If the student clicks on an incorrect comparison they should hear “Incorrect, try again”.
- The student should be able to start the next trial which will randomly select another picture to test/train them on.
We started this program by creating a new mainstack, then added a card by clicking on menu item “Object”, then selecting “New card”. Thus we had a stack with two cards. We like to save regularly – to do so, select menu item “File” then select “Save” or “Save As”.
To navigate from card to card you can do any of the following:
- Bring up the Application Browser – Menu item “Tools”, “Application Browser”. You can click on each card in the “name” window and see the contents of that card (the objects you put on the card) and your stack window will switch to that card (see Figure 2).
- You can use Menu item “View” to “go first”, “go Prev”, “go next”, etc.
- You can click on the Message Box icon (see Figure 2) and in the line at the top of the box type “go to card X” – replace the X with the card number you want to go to, for instance “go to card 2”. The message box is a way to tell LiveCode to do things – for instance, if you have a text field on a card and type Put “hello” into field 1 the word hello will appear in field 1. It is a convenient way to test out some code you have written.
Working on card 1 first, add a button then double-click on it in edit mode, then change its name to “Start” (see Figure 2 to identify the Property Inspector). Edit the script of the button (click the code icon, or right click the button while in edit mode) and create a handler that will make the program go to card 2. Here is the handler:
on mouseUp
   go to card 2 --- takes user to card 2 where training occurs
end mouseUp
When the user clicks on the button, card 2 will be immediately presented (it should be blank to start with). Click the button while in run mode – the button should disappear – it really did not, you are now on card 2 – and since there is nothing on it, it looks exactly like card 1, minus the button. On card 2, drag over 4 image objects from the tools palette (see Figures 2 & 5 for image objects). Make them to be about equal size, position them on the screen where you would like them, then make sure to lock the size and position. If you do not, when you specify an image for that object to display, it will be at the size of the original image, which with modern digital cameras usually is really large – as large as or larger than your screen. See Figures 5 and 6 for the sizing we chose (ours has pictures in them; newly created images will only display a box in outline form). To lock the location and position of an object (in this case the images), double click on one of them to bring up the Property Inspector. Be careful not to click on another object at this point – if you do, the Property Inspector will give you details about the object you just clicked on. You can check which object you are inspecting by looking at the top menu bar of the Property Inspector (see Figure 6). In the top pull down menu which likely reads “Basic Properties” change that to “Size and Position”. On that new screen (looks like Figure 6 panel A) put a check mark in the “Lock size and position” box. This will prevent a large photo from making the image object grow larger, but note, it will also prevent you from moving the images around the screen (unless you uncheck that box). Once you have done that, use the Property Inspector - top pull down menu - again to change back to “Basic Properties”. Click on the folder icon alongside the “Source” (See Figure 6, panel B) – when you do, LiveCode will prompt you to find an image you want to display. We put all the images we were going to use in the same folder as the LiveCode stack – you can just create one on your desktop to find it easily. It is important to know that when you use the source button, that image is not in the stack (source means you have specified the external picture file to use for that image object to display) – if you want to give your stack to someone to use, you need to give them the images and preferably all located in the same folder (otherwise that image may not display – look for DefaultFolder in the dictionary if you run into problems with this issue). If all goes well, when you locate the image you want, it should display in the image box you put on the screen, similar to the four images in Figure 5. Before you go on to the next image, give this image the name you want your student to call it. For instance in Figure 6, panel B, we named that image “Pigeon” as it was a picture of a pigeon that we selected. Repeat these steps for each image object: locking the size and position, setting the source to an
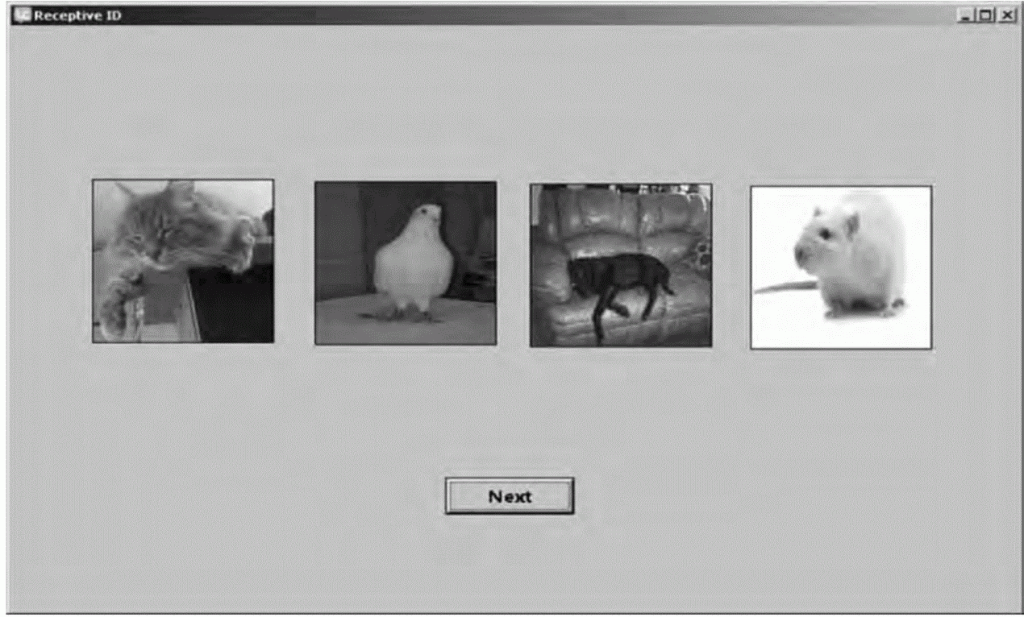
Figure 5. The second card of the receptive identification stack – the 4 pictures are image objects that were dragged on the screen and assigned an image. The next button arranges the next trial by sending an “openCard” message that triggers the handler in the card script (see text for more details).
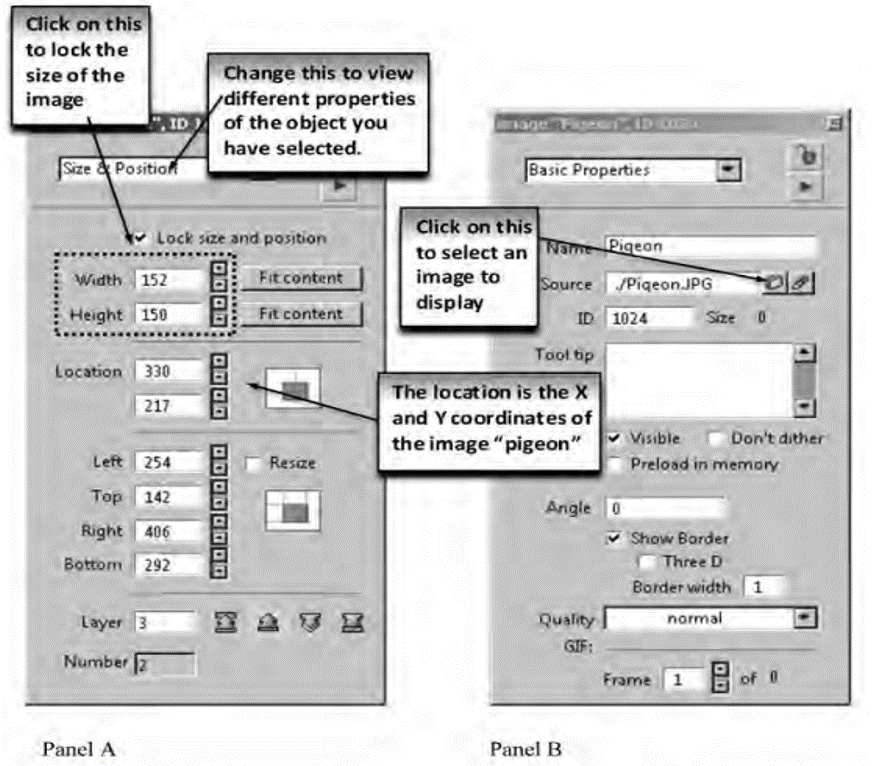
Figure 6. The Property Inspector after double-clicking on one of the image objects. This one is named Pigeon and will be set to display a picture of a pigeon. In panel A the inspector is set to examine the “Size and position” of the object via the pull down menu (see top of image in panel A). Notice the check mark used to lock the size and position of the image. The second dotted box shows the X & Y coordinates of the center point of the pigeon image. In panel B the Source (the file from which the picture will come from) is indicated by an arrow. Clicking on the folder icon allows an image file to be selected.
image on your computer, and finally naming the image the name of whatever image you selected. Now the coding part comes in. In edit mode, right click on the card (on the card itself, don’t click on any objects) – you should be on card 2. Select “Edit Card Script”. You will enter the following handler into the card script:
on openCard
   Global whichPicThisTrial
   put the short name of image 1 & return into ThePictureNames
   put the short name of image 2 & return after ThePictureNames
   put the short name of image 3 & return after ThePictureNames
   put the short name of image 4 & return after ThePictureNames
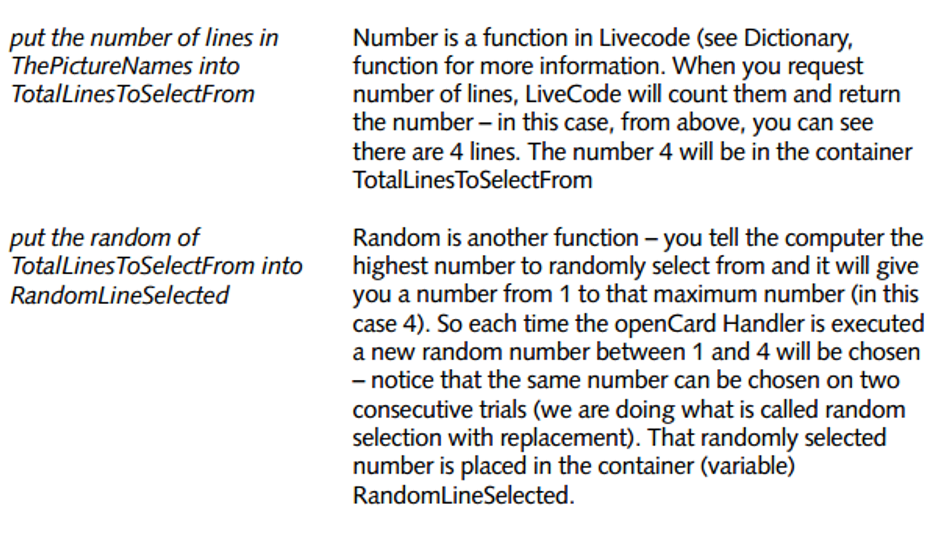
   put the number of lines in ThePictureNames into TotalLinesToSelectFrom
   put the random of TotalLinesToSelectFrom into RandomLineSelected
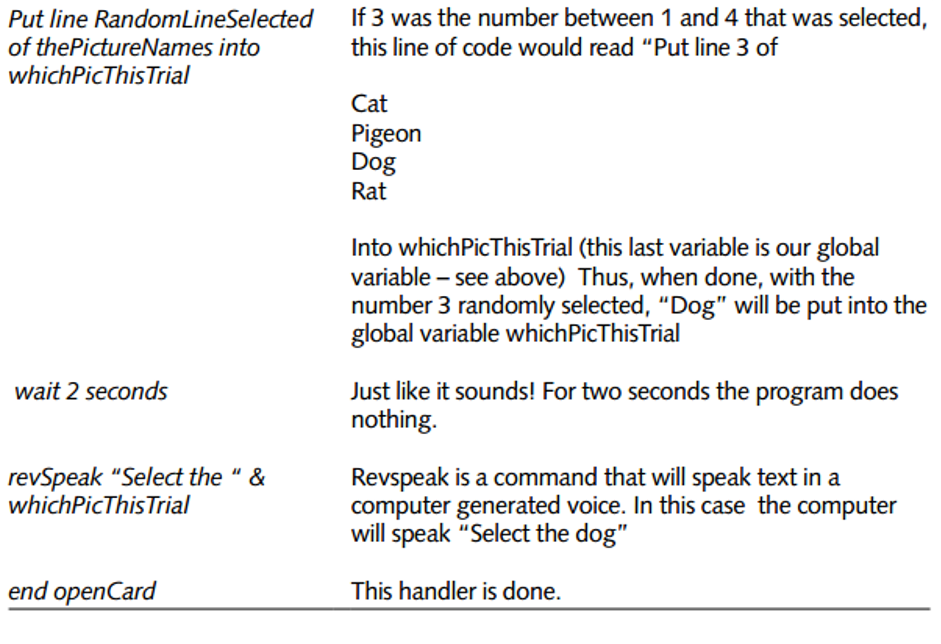
   put line RandomLineSelected of thePictureNames into whichPicThisTrial
   wait 2 seconds
   revSpeak “Select the “ & whichPicThisTrial
end openCard
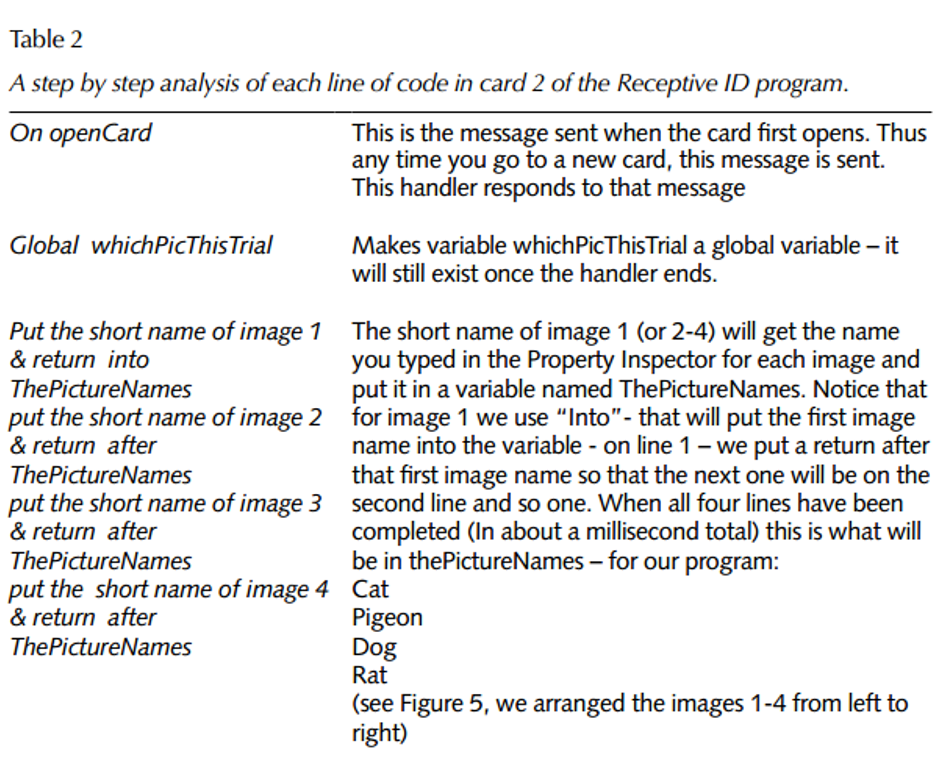
Reading this code now may make some sense, but see Table 2 for a step by step explanation of each of these lines of code. To summarize, the openCard handler will be triggered whenever an openCard message is sent to the card (usually when you first visit the card). Once the whichPicThisTrial is established as a global variable, a list of all the pictures presented on the screen will be made (the list is contained in the variable ThePictureNames). The contents of ThePictureNames will look like this in our case:
- Cat
- Pigeon
- Dog
- Rat
That is, one picture name per line. Next we need to figure out the number of lines in that container – thus the code “put the number of lines in ThePictureNames into TotalLinesToSelectFrom” will put that number (4) into the variable called “TotalLinesToSelectFrom”. Then we use the Random function of LiveCode to randomly select a number from 1 to 4 – “put the random of TotalLinesToSelectFrom” and we store it in the container “RandomLineSelected”. Filling in the contents of the TotalLinesToSelectFrom, this code will execute this: “Put the random of 4 into RandomLineSelected”. We then use that randomly selected number (assume the number 2 was randomly selected) to specify which image we want the student to select “put line RandomLineSelected of thePictureNames into whichPicThisTrial” which, when we plug in the contents of each container (RandomLineSelected and thePictureNames) used, ends up being
- Put line 2 of
- Cat
- Pigeon
- Dog
- Rat
into “whichPicThisTrial” (our Global variable). Since 2 is the number that was randomly selected, then “Pigeon” will be in the “whichPicThisTrial” container. The next line of code has the computer wait for 2 seconds – since computers are very fast if you did not put the delay in, once a student arrives in this card (and the openCard message is sent) almost immediately the computer will ask them to select an image. The student needs a few seconds to orient to the screen (these wait times are often called inter-trial intervals in discrete trial training). The last line of code should be somewhat familiar to you now: revSpeak “Select the “ & whichPicThisTrial. RevSpeak of course is a command to speak some text. The text you are directing the computer to speak is “Select the” and the contents of whichPicThisTrial – which ends up being “Select the Pigeon” – which, if your computer sound is on (not muted), you should hear in the computer voice. These voices are changeable, as is the speed and pitch – open the dictionary and search for revSpeak. The “See Also” clickable links in the dictionary definition of a term will provide information on these additional options. We often test our code to see if it is working correctly – two easy methods are:
- While in the script editor (depicted in Figure 3) click on the green arrow and select the handler you want to run.
- In this case, send the openCard message to the card – to do so you can simply type “openCard” into the Message Box (see Figure 2 to open the message box) and press return – the openCard message is sent – don’t be surprised if it takes a few seconds for you to hear the voice – after all you did tell LiveCode to wait for 2 seconds.
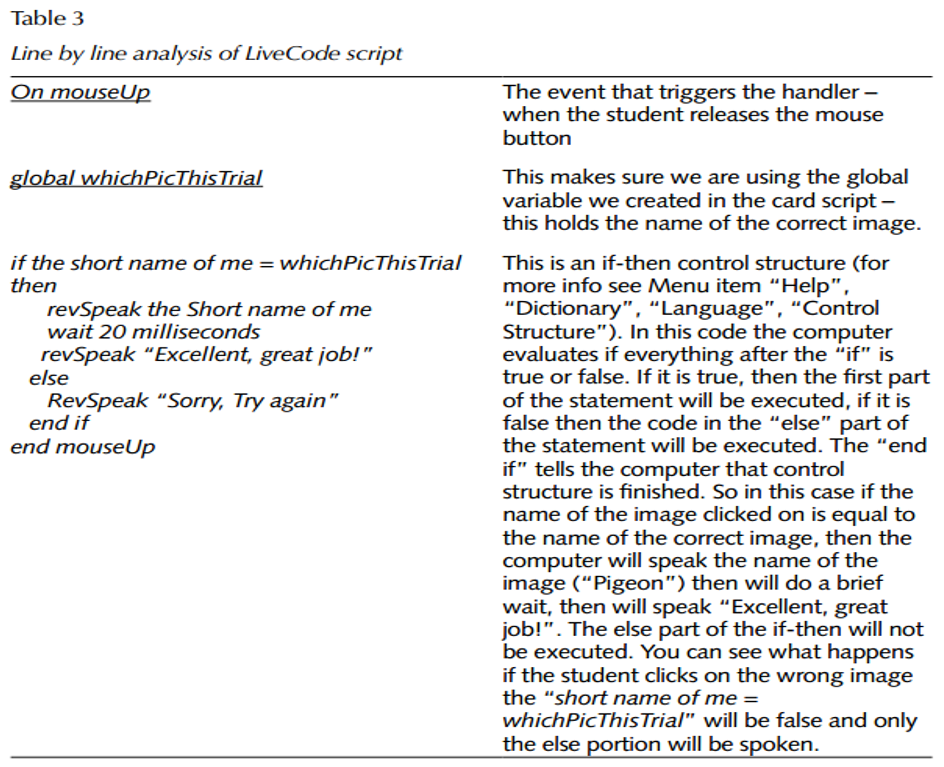
Next we want to put some code in the buttons so when they are clicked on we can determine if the student selected the correct image and give them some feedback. Here is the code we created:
on mouseUp
   global whichPicThisTrial
   if the short name of me = whichPicThisTrial then
      revSpeak the Short name of me
      wait 20 milliseconds
      revSpeak “Excellent, great job!”
   else
      RevSpeak “Sorry, Try again”
   end if
end mouseUp
Table 3 shows line by line what the code does. If this handler is copied and pasted into the script of each image then whenever the student clicks on an image LiveCode will evaluate if it was the correct one or not and deliver your programmed feedback. At this point there is only one thing left to do – allow the student to start a new trial. You might suspect that it is as simple as running the “openCard” handler again – and you would be correct – “Excellent, great job!” This can be done many ways – we opted to have a button on the screen (see Figure 5) named “Next”. In that button script is a single handler:
on mouseUp
   opencard -- this sends the opencard message and starts the next trial
end mouseUp
d
This allows the student to control the pace of the instruction. If you prefer to have control over when the next trial is presented you can send the openCard message in the image’s if- then statement like below – after a correct response:
revSpeak the Short name of me
wait 20 milliseconds
revSpeak “Excellent, great job!”
openCard
The next trial will start after the student clicks on the correct image. This is a very simple program – you might want to add in many other options – for instance count the number of correct and incorrect responses. You can include “add 1 to theCorrectsContainer” in the correct response portion of the if-then control structure above and “add 1 to theIncorrectsContainer” in the else part of the if-then statement (make them global variables so you can increment them after each trial). You can block out the rest of the computer screen by writing this line of code: “set the backdrop to black” and get rid of it with the code “set the backdrop to none” (it eliminates distractions from the computer’s desktop - you will likely put it in a card script – “on openCard” or stack script “on openStack”). You can randomize the order of the images on the screen using the images location property (a single x-y point in the center of the object, in pixels- see Figure 6, panel A). You can use a similar technique we used in the card to randomly select the correct image for each trial – put all the image locations into a container, then randomly select (deleting the one you selected so you don’t place two images in the same location) and using the code “Set the location of image 1 to TheContainerHoldingXYC oordinate”. The nice thing about the way this simple program is designed is that you can change what image is displayed, as well as the names of each image to modify what the student learns. For instance if you wanted to train colors, you could put all dog pictures in and change the name to “yellow” or “yellow dog” and it will still work perfectly. You could also train more complex conditional discriminations – for instance have two triangle pictures and two circle pictures with each one colored with two different colors (e.g. chosen from red, green, blue and yellow) and name the images accordingly – “red and green square” or “red and green circle” and it will still work. You could also give more specific feedback on incorrect answers – for instance, in the “else” portion of the if-then statement you could have the code: RevSpeak “Incorrect. You selected the “ & the short name of me & “ Try again.” Notice the spaces just after “selected “ and just before “ Try Again” – this is intentional if you did not put it in and the user incorrectly selected “Pigeon” the computer would try to speak: “Incorrect. You selected thePigeonTry Again” which would sound interesting but probably not the feedback desired. Finally, the code presented in the card stack was created for pedagogical reasons – see Appendix C for a more efficient/effective code.
Next Steps
Needless to say, there are many more capabilities of LiveCode that we were not able to cover. Once you get the basics down and understand LiveCode and its language, the learning curve rapidly accelerates. For research and application purposes, learning to save your work as a standalone application – for different platforms – is a good next step. A standalone is a version of your program which you can give to participants for whatever platform they work on – Macintosh, Windows, Linux/unix and of course smart phones (IOS or Android). The end user cannot see your code, nor modify it. The smart phone apps are a bit more difficult – not on the programming side, but rather in getting the apps on the phones. Apple (IOS) requires app developers to register with them and install certificates to verify their identity. Android has some similar precautions, but allows developers to install the app via a USB connection to test the programs. Of course it is a fully functional program so we have used it to load programs for various purposes. We created a simple Android program that mimics the Motivaider (http://www.motiv-aider.com/) which vibrates on various schedules to evoke whatever responses you have trained. The Motivaider has been the focus of a number of research articles (e.g. Legge, Debar & Alber-Morgan, 2010). It is a very simple LiveCode program – it only has one card, and one button. In the script of the button is the following code:
on mouseUp
   mobileVibrate 3
   send mouseUp to me in 40 seconds
end mouseUp
Whenever the “mobileVibrate” is issued the phone will vibrate – in this case 3 times since we have the “3” after the command. In this case the phone will vibrate every 40 seconds. Of course you could put a text field on the screen and the user could type in the number of seconds with the following code modification:
on mouseUp
   mobileVibrate 3
   put field 1 into SecondsToWait
   send mouseUp to me in SecondsToWait seconds
end mouseUp
This way, the end user could set the time interval for however many seconds they prefer, or an experimenter tells them to set. Other variations may be obvious now – for instance using the random function to generate random intervals for the vibrations. Other programs are just as simple to write – programs that allow you to record observations of various behaviors – you could use taps to the card 1 window – handling the “mouseDown” or “mouseUp” messages or have several buttons that count the number of different responses, all the while tracking time. To time events we typically use “the milliseconds”. If you type “put the milliseconds” into the message box, you will get a number such as: 1412224054953. This definition is from the LiveCode dictionary when we looked up “milliseconds”: The milliseconds function returns the total number of milliseconds since midnight GMT, January 1, 1970. Thus, it is easy to have quite precise timing between two events – for example, in a single button script we put the following handlers:
on mouseDown
   Global theTiming
   put the milliseconds into TheTiming
end mouseDown

on mouseUp
   Global theTiming
   put return & the milliseconds after TheTiming
   put Line 2 of thetiming – line 1 of thetiming into TheElapsedTime
   put theTiming & return & TheElapsedTime
end mouseUp
Below is what appeared in the message box (if you use “put” but do not specify a container – a field or variable – then LiveCode automatically puts it into the message box)
1412224412962
1412224413034
72
(If you were really ambitious you could determine the date and time we wrote this part of the article, using these numbers)
The mouseDown stored the milliseconds observed on the first line above; the mouseUp did the same putting it in line 2 of the container “theTiming”. The next line found the difference between the mouseUp time and the mouseDown time and put that number into a container called “theElapsedTime”. The last line just displays the numbers in the message box. Since LiveCode is a higher level programming language, and the computer’s operating system is often doing other things, we generally use milliseconds for timing, but consider it accurate to about a tenth of a second, which is usually more than the resolution we need in behavioral research. Finally, spend some time learning how to use the powerful debugging tools in LiveCode – here is a great site for this as well as other LiveCode instruction: http:// revolution.byu.edu/debug/Debugging.php. The debugger will allow you to analyze your code one step at a time – peering into variables as you go, and examining how your code is behaving (or sometimes, misbehaving!).
Conclusions
Computer programs, and computer programming skills, can be a powerful tool allowing behavior analysts to discover functional relationships and basic principles as well as spreading behavioral technology by merging electro-mechanical technologies with behavioral technologies. In addition, the fine grain analysis that programming requires, likely helps behavior analysts become better at the molecular approach to analyzing tasks which some behavior analysts promote (Palmer, 2010; 2012) as do the authors of this paper. In addition, once a minimal repertoire is established in a programming language, the programmer mainly engages in problem solving – and we can all use improvements in that skillset. Of course programming repertoires will not develop overnight – persistence is essential. We have found it helpful to learn programming by picking a project with personal relevance and learn what is needed to accomplish that project – it taps into existing motivative operations (Michael, 1982) – the same thing we try to arrange when working with clients or students. Recent advances have led to the development of effective technologies that can transduce topography-based behavior into states usable by a computer. The Kinect (Microsoft Kinect, 2011) can track and analyze body positions quite effectively, while speech to text recognizers such as SIRI and DragonSpeak can tranduce speech into text which of course can be manipulated in LiveCode. Virtual Reality headsets are commercially available for creating very realistic artificial environments. These and other advances will allow behavioral scientists and practitioners to gather and analyze data in a more efficient and effective manner, not to mention in much more quantity. It will likely also open a whole host of new areas for research and application. As noted earlier in the paper, professional programmers are very good at creating computer code that is fast and efficient for the particular computer operating system they are working on. They may attend to the impact they have on the end user, but they are not trained in behavior/environment interactions. Behavior analysts presumably will be considering the antecedents, consequences and contingencies arranged for the end user, with efficient code only being a secondary consideration. While the applications that a behavior analyst might create using LiveCode may not be distribution (or market) ready, they certainly would function as a prototype for professional programmers to convert into distributable software, and as demonstrated in this article, are certainly acceptable for research purposes. We encourage you to adopt a programming language of your choice – other behavior analysts have also promoted this (Dixon & MacLin, 2003). It is true that one could hire a programmer, but we feel that the intersection of computer programming and behavior analysis is quite powerful, providing a new repertoire that combines with the behavior analytic repertoire to produce qualitative and quantitative advantages for research and application purposes.
References
- Apple Computer, Inc. (1998). Hypercard. Cupertino, CA. Retrieved October 152014 from http://download.info.apple.com/Apple_Support_Area/Manuals/ software/0340617AHYPERCARDI.PDF
- Association for Behavior Analysis International (2014). Retrieved October 1, 2014 from http://abainternational.org
- Beleboni, M. G. S. (2014, January). A brief overview of Microsoft Kinect and its applications. Paper presented at the Interactive Mulitmedia Conference, University of Southampton, UK. Retrieved from http://mms.ecs.soton.ac.uk/2014/papers/2.pdf
- Catania, A. C., Ono, K., & de Souza, D. (2000). Sources of novel behavior: Stimulus control arranged for different response dimensions. European Journal of Behavior Analysis, 1(1), 23-32. http://www.ejoba.org/PDF/2000_1/Catania_Ono_de%20 Souza_2000.pdf
- Dallery, J. & Glenn, I.M. (2005). Effects of an internet-based voucher reinforcement program for smoking abstinence: A feasibility study. Journal of Applied Behavior Analysis, 38, 349-357. doi: 10.1901/jaba.2005.150-04
- Dixon, M.R., & MacLin, O.H. (2003). Visual basic for behavioral psychologists. Reno, NV, US: Context Press.
- Donahoe, J. W. & Palmer, D. C. (1994). Learning and complex behavior. Boston, MA: Allyn & Bacon; reprinted in 2005 by Ledgetop Publishers.
- Duroy, A. (2005). Second order conditional discriminations. Unpublished master’s thesis, California State University, Stanislaus, Turlock.
- Escobar, R. (2014). From Relays to Microcontrollers: The adoption of technology in operant research. Mexican Journal of Behavior Analysis, 40, 127-153.
- Ferster, C. B. & Skinner, B. F. (1957). Schedules of reinforcement. East Norwalk, CT: Appleton-Century-Crofts.
- Granpeesheh, D., Tarbox, J., Dixon, D. R., Peters, C. A., Thompson, K., & Kenzer, A. (2010). Evaluation of an eLearning tool for training behavioral therapists in academic knowledge of applied behavior analysis. Research in Autism Spectrum Disorders, 4, 11-17. doi: 10.1016/j.rasd.2009.07.004
- Jakubow, J. J. (2007). Review of the book sniffy the virtual rat pro version 2.0. Journal of the Experimental Analysis of Behavior, 87(2), 317-323. doi: 10.1901/ jeab.2007.07-06
- Jang, J., Dixon, D. R., Tarbox, J., Granpeesheh, D., Kornack, J., & de Nocker, Y.(2012). Randomized trial of an eLearning program for training family members of children with autism in the principles and procedures of applied behavior analysis. Research in Autism Spectrum Disorders, 6, 852-856. doi: 10.1016/j.rasd.2011.11.004
- Jenkins, H. M., & Moore, B. R. (1973). The form of the auto-shaped response with food or water reinforcers. Journal Of The Experimental Analysis Of Behavior, 20(2), 163-181. doi:10.1901/jeab.1973.20-163
- LaMon, B., & Zeigler, H. (1988). Control of pecking response form in the pigeon: Topography of ingestive behaviors and conditioned keypecks with food and water reinforcers. Animal Learning & Behavior, 16(3), 256-267. doi:10.3758/BF03209075
- Lattal, K. A. (2008). JEAB at 50: Coevolution of research and technology. Journal of the Experimental Analysis of Behavior, 89, 129-135. doi: 10.1901/jeab.2008.89-129
- Layng, T.V.J., Twyman, J. S., & Stikeleather, G. (2003). Headsprout Early ReadingTM: Reliably teaching children to read. Behavioral Technology Today, 3, 7-20. http:// www.behavior.org/resources/191.pdf
- Legge, D. B., DeBar, R. M., & Alber-Morgan, S. R. (2010). The effects of self-monitoring with a MotivAider[R] on the on-task behavior of fifth and sixth graders with autism and other disabilities. Journal of Behavior Assessment and Intervention in Children, 1(1), 43-52. http://0-files.eric.ed.gov.opac.msmc.edu/fulltext/EJ916280.pdf
- Max, M. (2010). Tact training in children with autism: Discrete trials or computerbased programming. Unpublished master’s thesis, California State University, Stanislaus, Turlock.
- McMenamin, S. M. and Palmer, J. F. (1984). Essential Systems Analysis. Upper Saddle River, NJ: Yourdan Press. Michael, J. (1982). Distinguishing between discriminative and motivational functions of stimuli. The Journal of the Experimental Analysis of Behavior, 37, 149-155. doi: 10.1901/jeab.1982.37-149
- Michael, J. (1985). Two kinds of verbal behavior plus a possible third. The Analysis of Verbal Behavior, 3, 1-4. http://www.ncbi.nlm.nih.gov/pmc/articles/PMC2748478/
- Microsoft Kinect (2011). Retrieved October 1, 2014 from http://www.microsoft.com/ en-us/kinectforwindows/
- Morford, Z.H., Witts, B. N., Killingsworth, K. J., Alavosius, M. P., (2014). Gamification: The intersection between behavior analysis and game design technologies. The Behavior Analyst, 37(1), 25-40. doi: 10.1007/S40614-014-0006-1
- MotivAider. Retrieved October 1, 2014 from http://www.motiv-aider.com
- Page, S. & Neuringer, A. (1985). Variability is an operant. Journal of Experimental Psychology: Animal Behavior Processes, Vol 11(3), Jul 1985, 429-452. doi: 10.1037/0097-7403.11.3.429
- Palmer, D. C. (2010). Behavior under the microscope: Increasing the resolution of our experimental procedures. The Behavior Analyst, 33 (1), 37-45. http://www.ncbi. nlm.nih.gov/pmc/articles/PMC2867504/
- Palmer, D. C. (2012). The role of atomic repertoires in complex behavior. The Behavior Analyst, 35(1), 59-73. http://www.ncbi.nlm.nih.gov/pmc/articles/PMC3359856/
- Persicke, A., Bishop, M. R., Coffman, C. M., Najdowski, A. C., Tarbox, J., Chi, K., … Deering, A. (2014). Evaluation of the concurrent validity of a skills assessment for autism treatment. Research in Autism Spectrum Disorders, 8, 281-285. doi: 10.1016/j.rasd.2013.12.011
- Redner, R. (2009). Abstract second-order conditional discriminations in pigeons. Unpublished master’s thesis, California State University, Stanislaus, Turlock.
- Shahan, T. A. & Chase, P. N. (2002). Novelty, stimulus control, and operant variability. Association for Behavior Analysis International, 25(2), 175-190. http://www.ncbi. nlm.nih.gov/pmc/articles/PMC2731615/
- Skinner, B. F. (1938). The Behavior of Organisms: An Experimental Analysis. Cambridge, Massachusetts: B.F. Skinner Foundation
- Skinner, B. F. (1958). Teaching machines: From the experimental study of learning come devices which arrange optimal conditions for self-instruction. Science, 128(3330), 969-977.
- Stanton, J. (2010). Information transfer with a tactile device. Unpublished master’s thesis, California State University, Stanislaus, Turlock.
- Tarbox, J., Najdowski, A. C., Bergstrom R., Wilke, A., Bishop,M., Kenzer, A., & Dixon, D. (2013) Randomized evaluation of a web-based tool for designing functionbased behavioral intervention plans. Research in Autism Spectrum Disorders, 7, 1509-1517. doi: 10.1016/j.rasd.2013.08.005
- Trudeau, M (writer). (1990, July 27) Interview with B. F. Skinner [Radio series episode]. In NPR (producer), All Things Considered. USA: National Public Radio.
- Whalen, C., Liden, L., Ingersoll, B., Dallaire, E., & Liden, S. (2006). Behavioral improvements associated with computer-assisted instruction for children with developmental disabilities. SL P-ABA, 1(1), 11-26. https://www.msu.edu/~ingers19/ Computer-Assisted%20Instruction.pdf
- Whalen, C., Moss, D., Ilan, A., Vaupel, M., Fielding, P., Macdonald, K., Symon, J. (2010). Efficacy of TeachTown: Basics Computer-assisted Intervention for the Intensive Comprehensive Autism Program in Los Angeles Unified School District. Autism, 14, 179-197.: doi: 10.1177/1362361310363282

Inicia la discusión (0)
Parece que no hay comentarios en esta entrada. ¿Porqué no agregas uno e inicias la discusión?
Trackbacks y Pingbacks (0)
Abajo hay un recuento de los trackbacks y pingbacks relacionados con este artículo. Estos se refieren a los sitios que hacen mención o referencia de esta entrada.